
This post is picture HEAVY to make it easier for you to see the step by step instructions. I always thinks it's much better to "see" the directions than "read" them. There are also little tips and tricks along the way.
Measuring...
To start, we all have different window widths and lengths, so adjust for your own drapes. The drapes for my project were just for "looks"on the sides of the windows, not function. The drapes will never be closed in the office waiting room, so I only needed the 54 inch width of the home decor fabric. (54 inches is the standard width for decorator fabric on the large bolts at the fabric store.) If your windows are wider, you will need to sew panels together to get the width you need.
For the height or length of the drapes, measure the length from the rod (if using a pocket) or from the bottom of the clip ring (whatever system you are using). Take that measurement and add 12 inches.
For example, my windows finished at 90 inches...so 90" plus 12" is 102".
3 yards of fabric is 108 inches, so I purchased 3 yards for each side panel...always leave room for mistakes or mis-measures.


Tools Needed...
They are not necessary, but some items will make the job a little easier.
- lots of floor space!
- ruler
- tape measure
- pins
- scissors
- portable ironing mat and iron
- if you have them...rotary cutter and cutting mat
- quilt rulers if you have them...yard stick if you don't

Here's the fabric I used in case anyone wanted to know the name. I bought it at Joann's...here's the link

Drape Tutorial...
Just to worn you, you will be on the floor and on your knees a lot!! Lol.
To cut each panel or to straighten the edge, fold fabric in half lengthwise.

Line the sides and the part you are cutting with lines on the cutting mat and then trim with ruler and rotary cutter.
TIP...if you have tile floors, use the lines in the floor as a cutting guide.
If you have quilt rulers, you know they are only 24 inches long. In the picture below, I used 2 rulers to cut the longer length I needed. See the yellow one on the bottom and the red one towards the top?

Find the line on the bottom of cutting mat...

Add the second ruler to the top to extend the first ruler...

then line up the second ruler with the same number at the top of the mat.

Trim with rotary cutter all the way up, holding the second ruler when needed.

I also trimmed the selvage edge on both sides of the fabric. Selvage edges are very tightly woven and it pulls the fabric when sewn...making it pucker.

TIP...did you know all those dots on the selvage edge are all the colors used in fabric. This is great to take with you when picking other matching fabrics or paint colors for the room.

Once everything is cut, lay fabric on the floor and fold up the bottom 8 inches.
WATCH FOR DIRECTIONAL FABRICS WHEN DETERMINING THE BOTTOM AND TOP

8 inches

I placed the portable ironing mat under the hem and ironed flat.
So much easier to keep every thing on the floor when working, rather than moving all that fabric to the stand up ironing board every time.


Now unfold the 8 inch hem.

and fold up the raw cut edge to the ironed line.

You will have a 4 inch fold.


Ironed all the way across.

Now take that 4 inch fold and fold over again.

Iron flat again. You now have a 4 inch, double fold hem. Great weight for the drape to hang.


Use matching thread.

Sew close to edge. I use the inside edge of the foot as a guide.

TIP...pin the hem with the point of the pin towards the edge you are sewing, but not quite in the lane of the stitch.

That way you can sew away and not have to stop to remove pins or run them over and break a needle.

Hem is finished!

Lining Tutorial...
Pretty much the same for drapes, but the WIDTH of lining is 4 inches SMALLER than drape fabric, So for example, my drapery fabric is 54 inches wide...I cut the lining 50 inches wide.
Same way to trim or cut to length as drapes.

Lay flat on floor.

The DIFFERENCE in hem is...you will fold up 4 inches first.

Iron flat.

Open up hem...

and take raw edge and fold up to ironed line...2 inches

Iron flat.

Then take that 2 inch fold and fold up again.

You now have a 2 inch wide, double fold hem.

Match thread to lining too, for a professional look.

Sew close to edge with same pin technique.

Done!

Drape Assembly...
Lay hemmed drape on the floor, right side up.

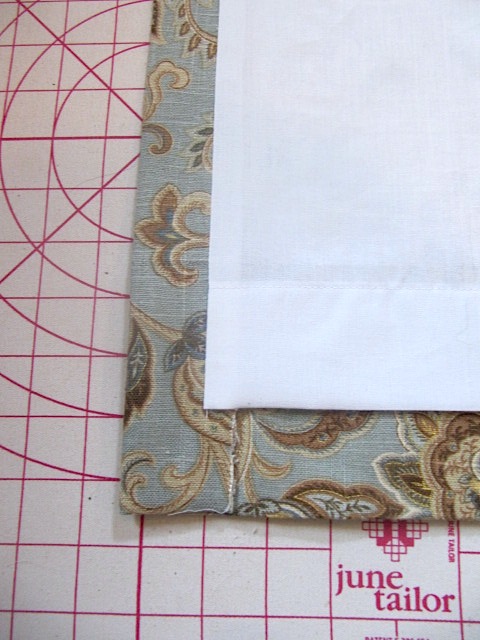
Now place your hemmed lining on the drape, RIGHT SIDES TOGETHER.
BUT only align one side of the edge.
I aligned the right side in this picture.
You will also leave 1-2 inches of drape fabric showing at the bottom.

Here is the close up of the hems. I measured 1 1/2 inches of drapery fabric showing.

Pin temporarily on the bottom until all measurements and smoothing are done.

Right side pinned, and bottom measured at 1 1/2 inches.

Now sew the RIGHT side only...the length of the drape with a 1/2 inch seam allowance.

Now the skootching part...
Unpin the temporary bottom pins.
Now drag over the lining fabric to the left side. (this is where the 4 inch difference comes in for the widths)

Line up the left side the length of the fabric.

Make sure you remeasure the bottom hems at 1 1/2 inches again.

Pin the length of the left side and sew with a 1/2 inch seam allowance, just like the right side.

Now you have a tube (open on the bottom and the top). Turn right side out.

This is the only time I took it to the ironing board. I pressed the seams with drape fabric on one side and the lining on the other. This cleans up the seams.

Back to the floor...
Smooth out the fabric so the the drapery fabric is showing...even widths on each side.

Close up.

Stay on the floor and iron both sides.


Finishing the corner points...
See that raw edge of the drapery fabric?
Fold it under diagonally.

Iron flat.

Sew with a hidden stitch. Start at the top...

Pick up a little of the bottom fabric and come up with a little of the top fabric.


See the little vertical stitches before you pull it tight?

Pull and they're gone.

Done nice and neat!

Top of Drapes...
This part is up to you...you may be using a rod pocket or clips or tabs.
To finish, just trim away so both fabrics are even.

Good gravy that's not very straight, Lol. I think this was my fourth panel and I was dizzy!!

Fold over once...

and then again. I did a 4 inch hem folded over twice to finish at 2 inches wide. This 4 inches and the 8 inch main hem gave me the extra 12 inches that I mentioned earlier.
Measure according to your needs.
Sew close to edge.

I used rings with the clips.

Lined drapes hang nicely from the weight and the lining protects the fabric from the sun.

Good luck with yours.
Happy Sewing,
~Karen~

What a wonderful tutorial Karen! Thank you.
ReplyDeleteWe thought so, too!!
DeleteMolly B from Temple, TX
Thank you so much for this fab tutorial. So easy to follow.
DeleteThanks so much Karen. It helped me so much.
DeleteKaren - I have been sewing for years and have made drapes many times for myself and friends - I have to say that this is by far the best Tutorial I have read on lined curtains. It is so easy to follow and understand and has even given me a couple of tips I didn't know. Thanks!
ReplyDeleteI loved both of your waiting rooms, but especially the one with these curtains. What a beautiful, welcoming room. And such a huge difference to the before.
Brilliant!
ReplyDeleteI might have a go myself now!!!
Awesome tutorial Karen!! The drapes are gorgeous! I chuckled at the part about checking on the direction of your fabric designs...I mistakenly sewed a nightgown for a customer with the flowers UPSIDE DOWN! I will NEVER make that mistake again, ha ha ha!
ReplyDeleteThanks Karen, I've been wanting to make some drapes for my bedroom but I've been a bit hestiant. Your tutorial is so clear and you're right about seeing the directions instead of just reading them. I'm a bit braver now and I will try making the drapes. Now I just have to find the right fabric. Thanks again. Kathy
ReplyDeleteWow, wow, wow! What a fantastic tutorial an your drapes came out beautifully!
ReplyDeletegreat tute, thanks
ReplyDeletePS I've got to stop spending so much time on blogs, so as you have [Goggle Plus] there will be times when I hit that rather than actually comment. The + will translate as " I came, I read, I had to dash, but I did enjoy the visit". I hope you're ok with this, and obviously understand when you do the same :-)
Karen this is an amazing tutorial! You did an excellent job and I think the best laid out, simple to follow directions on lined draperies I have ever seen! Thank you so much. I do not doubt my sewing and cutting skills but I simply had no idea how to make draperies and have never found directions that made clear sense. I have no doubts thanks to your tutorial that I can make them with no problems. Excellent post thank you so very much for taking the time to show each step and write clear directions. This is why I love your blog you are so talented!!! :)
ReplyDeleteThis tutorial was so great.....I think I'm going to tackle this! Great tips, too! Thanks a bunch!
ReplyDeleteVery nice, now to see if there is enough fabric!
ReplyDeleteThanks Karen for the the tutorial. This came at the perfect time as my daughter will be moving from an apt. to a house in a couple of weeks and I wanted to make some drapes for her. I have made curtains, but not drapes and not lined ones. Thanks again I will be making some soon.
ReplyDeleteI agree with other commenters...this is a great tutorial. You showed each step I wouldn't have thought of! Thank you!
ReplyDeleteBobi
http://westernwarmth.blogspot.com
Excellent tutorial, Karen! Your project turned out wonderfully. I'm planning to make some lined drapes to replace my old fabric vertical blinds that are 20 years old. I like the working on the floor idea :)
ReplyDeleteAwesome! Thanks so much for that wonderful tutorial.
ReplyDeleteI just did drapes for our bedroom and I did them exactly the way you showed. I had read it somewhere on the internet. These were my first lined drapes and I like this a lot. I think I will use this technique again when I need to. Unfortunately we do not have a camera right now, so I can't take a picture (unless I just use the cell phone).
ReplyDeleteWonderful tutorial Karen. I have been wanting to make drapes but really wasn't sure how to do it. This is perfect! I pinned it for future reference :)
ReplyDeleteThank you so much for this tutorial! My livingroom and dining room need a major window treatment makeover. Also I love your tutorials - I'm a very visual person so if I see it I can understand it much better, thank you so much!
ReplyDeleteThank you! I have always been afraid of tackling the lining for curtains. I am getting ready to make curtains for a bedroom, so this will come in handy. May I ask the pattern name of your fabric? It looks like it would work for my guestroom, which is taupe with light blue accents.
ReplyDeleteThanks,
Shar
Great tut on drapes. Lined drapes are difficult enough to make, let alone stopping to take pictures at every point! Thank you for doing this. Barbara
ReplyDeleteI love the half wherever I used to be in ;)
ReplyDeleteFantastic instructions! I have a living room window that is - I kid you not - 6 feet across. It's been very intimidating! I should be able to tackle it now with your wonderful instructions! - thanks!
ReplyDeleteThis comment has been removed by a blog administrator.
ReplyDeleteSeveral years ago, I made a shower curtain for one of my bathrooms -- just winged it, and it turned out pretty well. I'm getting ready to make another one for our second bathroom but have put it off, fearing it wouldn't turn out as well. This tutorial has given me confidence! Now, if only I can find the floor space!
ReplyDeleteKaren,
ReplyDeleteThis tutorial is excellent! Thank you so much for taking the time to put the pics are with the instructions. It is so very helpful. Beautiful drapes and love what you did with the dental office.
very good tutorial
ReplyDeleteThis tutorial is great. I was wondering if you could tell me how to finish the top if you are using the pins.
ReplyDeleteThis tutorial is great. I was wondering if you could tell me how to finish the top if you are using the pins.
ReplyDeleteif my window is 48" wide what do I add for over hang and how much for bunching?
ReplyDeleteFantastic tutorial! I am a sewing dummy and even I was able to follow these instructions and make some half decent drapes. Thank you!!!
ReplyDeleteThis is such a well written and photographed tutorial! I have made lined drapes several times and I use this method, but it's been a while and I could not remember whether or not to hem before sewing the sides together. I googled "lined drapes tutorial" and you saved the day! I have visited your blog many times before and always come away with helpful knowledge. Thanks so much!
ReplyDeleteI really appreciate the kind of topics you post here. Thanks for sharing us a great information that is actually helpful. Good day!
ReplyDeleteI've never sewn drapes before and I loved your tutorial! They look great, thank you!
ReplyDeleteThank you! Perfect tutorial, just what I was looking for and completely easy to follow.
ReplyDeleteExcellent Tutorial! I will be using this for my nursery curtains!
ReplyDeleteWow Karen, this tutorial is absolutely fabulous! I had all sorts of visuals in my head as I read and viewed the pictures. I'm a beginner sewer and I've never made drapes before, but I think I can do this based on your seemingly easy step-by-step instructions. I can select my own fabric and not spend an arm and a leg for ready-made ones. And to top if off, I would feel proud to say "I made them"!! I'm feeling very encouraged. On another note. What is the orange device sitting on top of the ruler? It appears to be something that keeps the ruler in place. If so, what is it called so I can look into buying one for myself? Additionally, what type of fabric do you use for the lining?
ReplyDeleteHuge Thank You! You're method worked perfectly. This was my first sewing project -- got my first machine last week -- now have the confidence to tackle our other two bedrooms. The detailed pictures and thorough descriptions were the perfect guide. I greatly appreciate your time and effort in putting this step-by-step detailed "how to make lined drapes" tutorial online for everyone. Again, well done.
ReplyDeleteThank you "SEW" ;) much for this excellent tutorial! I've seen many and didn't quite get all the steps. You nailed it with your simple descriptions, photos, and pro tips! I'll be referring to this again...until it's etched in my brain! :) Thanks again!
ReplyDeleteThis is my first attempt at sewing and my curtains turned out AMAZING! Your instructions are perfect! Thank you!
ReplyDeleteCool, got my fabic and now I can make mine without messing them up. THANKS SO MUCH.
ReplyDeleteThanks for the great tutorial. I bookmarked it and will attempt my first drapes soon. The pictures make everything much easier to understand.
ReplyDeleteDid you ever have an issue with the bottom of the curtain fabric and lining gaping open since it isn't hemmed together?
ReplyDeleteI left a comment a few days ago but wanted to return and tell you that I finished my two 95 inch panels for my living romn and they are beautiful. This is by far the best tutorial out there. Thank you so much for writing it. It was like having an expert with me every step of the way.
ReplyDeleteHi Michelle,
DeleteI'm so happy the tutorial was helpful for you. I'd love to see a picture of them!! I wanted to respond to you personally in an email, but there isn't an email address to your blogger account. If you ever want to add an address to your account, I have a tutorial on my side bar labeled "no reply".
Take care,
Karen
Karen,
ReplyDeleteI'm sewing lined bedroom curtains and the material is 43' wide. I'm wondering if the lined piece will be too wide if I sew two panels of curtain together and two panels of lining and then sew the side seams to join them as you've done in the tutorial. The one drape would be about 85' wide. The lining is black out lining and is heavy.
Thanks. I'd appreciate a reply if possible.
Judy
Hi Judy...there wasn't an email address to reply to your question, so I hope you return here for the answer. Usually, the width of each side panel is dependent on the width of the entire window. Measure the width of the window, multiple by 1.5 to 2 times then divide by 2 to find the measurement of each side panel.
DeleteFor example...
A window is 60 inches wide. Multiple 60 x 1.5 = 90 then divide 90 by 2 for each side panel, so 90 divided by 2 is 45.
Each panel should be 45 inches wide.
If you want more fullness then multiply the width by 2
60 x 2 = 120 then divide by 2, so each panel would be 60 inches wide.
Hope this helps
Thanks, Karen,
DeleteI understand how to determine the width needed for the curtains. My material only comes in 45" width. The windows are quite wide so I need to have 4 panels of the 45" material. My question was in regards to sewing the panels together so I would just have 2 wide panels, rather than 4 narrower ones. In doing that, I will also need to sew the lining panels together before joining them to the curtain fabric. Then the finished width will be about 83" or a bit more. Do you think that will be too bulky for one lined panel, if I sew it the way you have suggested? Thanks.
Judy
Hi Judy,
DeleteI think that width would be fine. I measured one of my panels on my front window and one panel is 100 inches wide. I didn't sew them, but they are lined. The center support on the rod helps with the weight of the fabric.
Thanks for your help!
DeleteThis is great! So clear and easy to follow. The pictures were so helpful. What kind of fabric did you use for the lining? Thanks!
ReplyDeleteMolly
Hi Molly
DeleteI used just plain cotton. It comes in different width sizes. 45 inches all the way to 108 inches wide. There is black out fabric and lining fabric, but some can be pricey...just depends on the how "fancy" the curtains are!! Lol
another tutorial said buy flat sheet from walmart for only $5.
DeleteVery useful to me since I'm planning to put some draperies in my window.Through this tutorial I can now make my own line drapes.Hope you will still post simple tutorial for home decorations.
ReplyDeleteHi Karen
ReplyDeleteThank you for this tutorial. I was trying to remember how to make lined drapes so I googled and found your blog. Your tips were an excellent refresher for me as I haven't made a pair of lined drapes in way too many years:)
Hello Karen,
ReplyDeleteI love your tutorial so much I ran out and brought fabric, you make it look so easy. I have only made kitchen curtain in the past and I surprised myself. I would like to go a step further and try my hand at a pair of drapes. I only have one question "How far apart should the rings be?"
Hi...I couldn't email you directly with the answer, because there wasn't an email address attached to your comment. I hope you return to see the answer here. I measured mine and the clip rings are about 5-6 inches part. For a normal size window, the package of rings has 7 hooks, so I spread them out according to how many hooks I have. You will need more hooks for wider windows.
DeleteHope this helps.
Karen
Hi KAREN,
DeleteYes I did return, and thank you very much. I will surely let you know how they turn out. (*:*)CANUCMYSMILE
THX AGAIN
Wow- thanks for saving me from having to miter the corners the old fashioned way! I have made many drapes and curtains but your hem way is way better than what I had been doing. Do you have a tutorial for duvet covers???
ReplyDeleteThanks again...
This comment has been removed by the author.
ReplyDeleteThanks for a great tutorial. I just spent a bundle on drapery fabric and want to do it right. I even bought the ironing pad that you used! My question is this: If you had a serger, would you have serged the edges? I have one and was planning to do that. What do you think?
ReplyDeleteSusan
Dear Karen,
ReplyDeleteIf you replied to my question via e-mail, I never got it. I think that Google has my address wrong. So if you wouldn't mind replying to it here, I will come back and see your reply. Thanks so much.
Susan
Hi Susan,
DeleteI did reply to your question, but just checked this comment that you left and your email address is no reply. So sorry I didn't check the email address. If you go to my blog on the right side there is post called "are you a no reply" it will show you how to change your blogger account to show your email address.
About the serger...if I had a serger, I would definitely use one for the seams. Nice finished edge and easy to iron the seams
Good luck with it. Let me know if you need any help with the drapes or your email address
Take care
Karen
Dear Karen,
DeleteI have two of four panels completed. I am a slow seamstress. In fact, my blog would be entitled "Susan Sews Slowly!" The serger is working well. However, it does entail lifting the drapes off of the floor two more times to serge the bottom before hemming, and then to do the same thing to the top. They are turning out very, very well. Thanks for all of the help.
So glad the drapes are coming out fine with the serger. When I was sewing the four panels, I was a slow sewer too...it's just so much volume of fabric and it's heavy too. Still cheaper than buying them though!!
DeleteDear Karen,
DeleteI finished the last two panels today. Mine were wider - I used 1 1/2 widths of the fabric per panel, and they were long - 98 to 103 inches. That made it harder, but they turned out well. Without your wonderful tutorial, I would not have been nearly as successful. Thanks again.
Susan
Hello Karen,
ReplyDeleteHave you ever used round rings that work with drapery hooks? Your tutorial is perfect for what I want to make with the exception of using drapery hooks. I'd love to know if you've used them before. I don't plan to create pleats or anything fancy. I want the to look just like yours but with the hardware change. I've got very high, vaulted ceilings and cannot use the clips due to the weight of the drape when finished.
Thanks for any info you might have.
Julia
Sorry, I've never used the round rings. I think you mean the rings that have the little metal circles on them that you sew directly to the drape. I think that would work fine though.
DeleteGood luck and let me know. I couldn't reply to you directly, because there wasn't an email address. I hope you will return here to see the answer.
Wow! The best tutorial on curtain lining!! I even bought several books on the subject but the explanations were so sketchy that I just did not understand how to do this lining-business! You totally rock! Thank you!!!!:)
ReplyDeleteThis comment has been removed by the author.
ReplyDeleteThis is a great tutorial and the pictures are wonderful. I'm planning on making new drapes for the dining room as soon as my fabric arrives because of it. The only thing I plan on doing differently is that I'm going to use a blind hem foot/stitch for the bottom hem seam. Oh, and I'm planning on using my walking foot for the sides when I sew the lining to the drape fabric to cut down on the "creep" that normally happens when sewing such a long straight distance. Thanks!
ReplyDeletethank you jerri for this as i too thought to use my blind hemmer for bottom and walk foot for sides. what do you think about her method for top? i think that will puff lining out when double folding all those layers for the hem. shouldn't lining just be cut to finished height?
DeleteI just used this tutorial to make drapes for my daughters' bedroom. What a great, detailed tutorial! Thanks so much!
ReplyDeleteI love the way your curtain tutorial flows. Lots of photo's and minimum reading:)
ReplyDeleteThank you
This comment has been removed by a blog administrator.
ReplyDeleteThank you for this tutorial, so helpful, my curtains turned out great!
ReplyDeleteWendy McSteen
ReplyDeleteKaren, thank you so much for putting this tutorial together. It is, by far, the best one I have ever seen and so helpful. You explained everything so well. This has motivated me to start a curtain project I have been putting off for a long time. Thanks again.
Yesterday I used your tutorial to make 98" panels for my master bedroom. Incredibly easy to follow and they look great. My 3 year old daughter padded into my bedroom this morning, her eyes lit up and she exclaimed, "Momma those are beautiful!" Looks like I need to make some for her room next. Thank you!
ReplyDeleteThank you for taking the time to write this tutorial, I was so glad to find it in time to make my curtain today. I have only the header left to do in the morning, and so far so good I think. The only difficulty I had is being able to lay it out flat on the floor as there is so much of it. I just hope I have it straight. We will see tomorrow and if it works I will be so happy as this is my first curtain. Thank you once again.
ReplyDeleteTracy x
Hello Karen, a most wonderful tutorial.. I haven't sewn much your tutorial has given confidence. Having already purchased the fabric and your tutorial I believe I can do this. :)
ReplyDeleteI have a problem. When I hung the draperies, the front of the pleat below the header wrinkles aways and does not hang smoothly. The clips are about 13in apart, the fabric is linen, they are lined and 8 ft long. Thanks for any suggestions.
ReplyDeleteThank you for the tutorial! I have made curtains before, but none lined, and I had put off doing it until I saw this! They turned out beautifully!
ReplyDeleteI used a very similar technique (really, all the same except the top, where I used buckram) and I cannot get the long side edges to stay crisp, even after ironing. The lining (a blackout lining) should be about 3" in from the edge, but the edge poofs out and you can see the lining. It looks sloppy. I hate to machine stitch a big seam 3" in from the edge, since I've done so much work to avoid seeing seams...any ideas?
ReplyDeleteThis comment has been removed by the author.
ReplyDeleteThank you for the great tutorial! :)
ReplyDeleteI followed your directions and ended up with the nicest drapes in the whole house! Now I am going to make more for me and some for my daughter. I have shared this blog with many of my friends. Thanks!
ReplyDeleteThis was wonderful! I just finished my first panel of 6 and I am so proud of my final result. This was very clear and easy to follow - thank you!!
ReplyDeleteThank you so much for these very clear and easy to follow instructions!!! It obviously would have taken you a long time with all the detail and pics you included - please know it was much appreciated :) I made curtains for my nephew's bedrooms and they look fantastic! Thank you very much.
ReplyDeleteI am making curtains for both living room and dining room and found your pictures. They are very helpful. the instructions are clear and easy to follow. Thank you.
ReplyDeleteCarolyn @ frenchcountryathollycottage.blogspot.com
Have you had any success putting grommets at the top? My daughter's ceiling is not far enough above the top of the window to use the clips. I am trying to decide between grommets and a rod pocket. However, I don't want to use plastic grommets, and I am finding that metal ones require special machinery. Will a grommet even go through the 6 layers of fabric that result at the top?
ReplyDeleteHi, I've made curtains with metal grommets before. Usually the grommets come with the tools you need to put them on. I have a grommet tool and I never use it because I don't think it works as well as just using a hammer and the tool in the package. As long as you get a grommet with a long enough center post it will go through many layers of fabric. You have to get the right size grommet for your particular project.
DeleteI just made my first drape panel using your tutorial and it turned out great. Thanks for your tutorial. My drape material is the same design as yours only in a different color. What a coincidence!
ReplyDeleteBest. Tutorial. Ever. I feel totally empowered. I think I may make curtains for my whole house. I put a link to your tutorial on my blog. Thanks so much for the clear and easy directions and especially for all the pictures:)
ReplyDeleteSo helpful and clear! Thank you!
ReplyDeleteI wish your great tutorial would pop up first. Perfect and so helpful. And most importantly, you do it right.
ReplyDeleteI just finished my 3rd set of drapes using this tutorial! It's the best that I've found! Thank you so much...My rooms are looking great! :)
ReplyDeleteGOD BLESS YOU! I just started using my sewing machine. I was intimidated to get it out of the box. This tutorial is better than any tutorial on you tube. Thank you for spelling it out for me!!!
ReplyDeletethank you for the clear, simple, straight forward instructions. I had started a set of drapes prior to finding your site and am currently ripping out seams and trying to iron out folds in the fabric.
ReplyDeleteAppreciate your efforts.
I used this tutorial to make drapes today - thanks for posting!
ReplyDeleteReallly good tutorial. Thank goodness for digital cameras!!
ReplyDeleteJust a small tip. On large drapes, check your diagonals when your material is laid out, unstressed, on the floor. They must be equal. If not, then your rectangle is not square and your drapes will finally never hang 'quite right'.
Amazing Tutorial! I looked at many different ones before choosing this one. Very clear directions for a novice like me! I started my curtains late yesterday for our baby nursery and finished at 3am (nesting!) and they look just as great as the custom ones we have in our dining and master suite! THANKS SO MUCH!!!
ReplyDeleteThank you so much for taking the time to create a tutorial like this. I'm just starting the project of making my first drapes for my living room out of burlap. Your tutorial has been so helpful, and the directions couldn't be more clear. People like you are awesome!
ReplyDeleteThanks for taking the time to do this with all the pictures. It is so helpful to so many of us even years after you posted.
ReplyDeleteThe picture looks so impressive, thanks for the sharing this tutorials.
ReplyDeleteThis is FANTASTIC! Just completed my first panel. Saving $1200 on my workroom quote for 6 panels!!!
ReplyDeleteGreat tutorial! Just finished drapes for living room windows. Your photos were great and the instructions were clear.
ReplyDeleteAwesome tutorial....the best I have found! Thanks!
ReplyDeleteBrilliant tutorial. So clear and easy to follow. I've used this tutorial 3 times now and have it saved in my favourites as I never know when I will need it again. Many thanks for putting all this together. So appreciated.
ReplyDeleteLove your instructions, I've used them multiple times!!! Thanks so much.
ReplyDeleteBrilliant! Used your tutorial yesterday to make new drapery panels for our dining room. As others have already said, it's the best one out there. Thank you so much!
ReplyDeleteI've just finished using your instructions for the third time. They are so thorough and easy to follow. Thanks for helping me improve the look of my family room, office and now my sewing room.
ReplyDeleteFantastic tutorial. Thank you. extremely easy to follow and with the pictures.... this was the first time I made lined drapes/curtains and they came out wonderful. Thank you. On to the next room.....
ReplyDeleteI have used this tutorial to make two sets of drapes for my daughter, and four sets for myself. I am now getting ready to make new drapes for my living room and dining room. I am so thankful to you for posting this. There is not a thing about his wonderful tutorial that I would change! Thanks!
ReplyDeleteSusan
Thanks so much! Although I have sewn many panels, I picked up some fabulous tips from your post. You wrote this almost 3.5 years old and it's still going strong!
ReplyDeletehiya, I am from Auckland New Zealand and boy, have I been waiting for this tutorial! I always have my curtains made but a new lady came and offered and made a complete mess so I redid them myself! I bought tape to make it sort of french folds and she pulled the threads that help the fold so now don't know what to do, unpick the tape and start again?
ReplyDeleteGreat tutorial! I have also made numerous curtains/drapes, this is by far the best and easiest I have seen. Just what I needed to get me started on my latest. Thanks
ReplyDeleteI never thought I could make lined drapes until now. You made it seem so easy. Thanks for showing me how step by step.
ReplyDeleteThanks for this post. The hardest thing for me to understand is cutting and getting the fabric squared. Can you tell me what the red tool is that is on top of your rulers and how it works? Thanks.
ReplyDeleteThank you SOOOO much for your wonderful and clear tutorial! It is so helpful to have the pictures right along with your easy directions. My daughter needs help with her living room drapes and I've never done this before. It's scary to begin a project like this and hope we get the measurements correct so that money is not wasted. After reading and seeing your tutorial, I feel like I can do this, so THANK YOU AGAIN!!
ReplyDeleteI just finished my lined curtains and I could NOT have done it without your tutorial. So glad I found it! Thanks so much:)
ReplyDeleteGreat tutorial! My drapes turned out perfect!
ReplyDelete